

Translated by: Jane Laurence.
In the spring of 2017, I had the opportunity to teach a ten day Stavlinebygg course at North House Folk School (northhouse.org) in Grand Marais, Minnesota.
Here is a video from the project, produced by Layne Kennedy.
The course ran over two sessions. The first session (4 days) was spent using broad axes to hew a large pile of entire Red Pine and Balsam Fir logs into square timbers. These would be used as the timber stock for the building. The course participants were a very dedicated gang that was turned loose on the timbers with a variety of ‘bile’ (a Norwegian builders’ broad axe) and other specialized axes (mostly from the Hordaland/Bergen) region of Norway. One participant had gone to the extent of obtaining their own ‘bile’ from a local blacksmith, done in a traditional Norwegian style. Most of the stock was fashioned using typical Horda broadaxes but the ridgepole and purlins were treated to a surface using the ‘glepphugger axe» ( a very specialized blunt and rounded axe that is used with a glancing stroke, creating a scalloped, faceted surface). We tested various techniques for smooth hewing with the different broadaxes. Students found their preferred postures, pairing them with broadaxes which had handels that varied between straight, curved and off-set. We also experimented with various heights of the logs, which were held by log dogs to the bucks which supported them. Students using higher bucks stood more upright and along side their log. On the logs positioned lower, students straddled their log. Several opted for protective legwear.
Hewing timber With Steinar Mølster
The participants worked on their timbers from 9-5, taking quick lunch breaks and often needing to be reminded to quit at the end of the day. There were many aching muscles and most slept very soundly. About half the participants camped out in the local campground which borders the campus.

A purlin whose surface has been fashioned using the glepphugge axe.
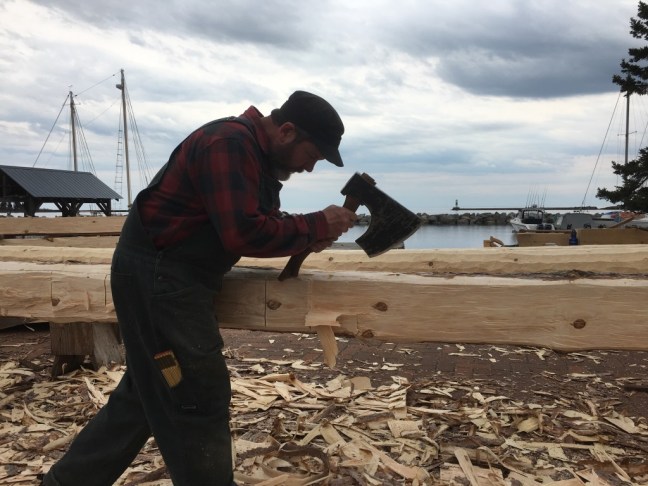
Scott Carlson is a very experienced American timber framer. He is shown hewing a timber using the offset broad axe. He stands to the side and his posture is mostly upright.
(http://sweetgrassjoinery.com/)
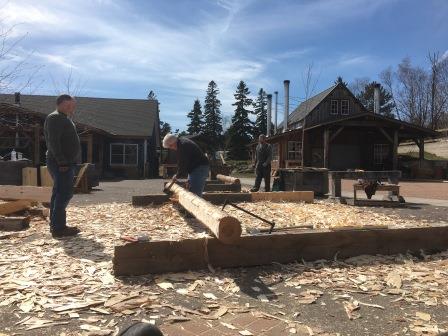
Joe Donohue and Steven Matthew worked together to hew stock.
 Steven Matthews swings a broad axe (bile). In the background we see Shawn Jensen glepphugging a purlin.
 A very practical solution for carrying timbers
Most of the logs had been turned into timbers in the course of the first four-day block. We were very lucky and received a visit from six members of the Norwegian Skottbenk Union who used our free day to demonstrate splitting and hewing planks from full logs, blacksmithing, and the construction of hand planes to the community at large which was invited to the campus that day. In the evening everyone relaxed at a pizza party, followed by a lecture on traditional building methods of Norway by the author and beautiful fiddle music by two of the Skottbenk Union, Siv Holmin and Roald Renmælmo.

Roald Renmælmo from the Norsk Skottbenkunion demonstrates using a foot saw (a long frame saw on a locking joint.
Link to article on proper foot saw technique.
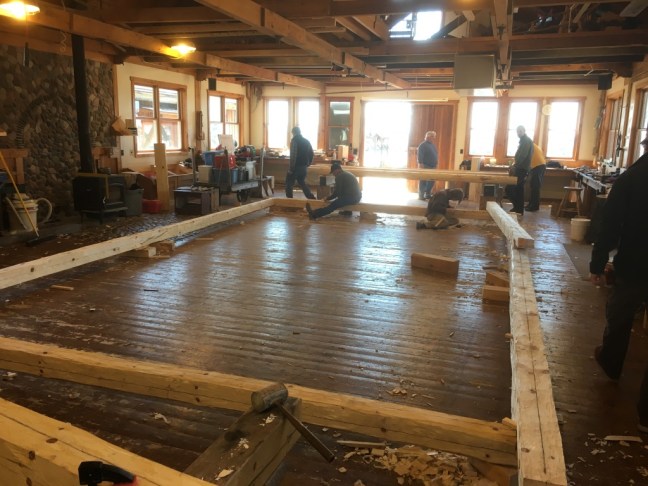
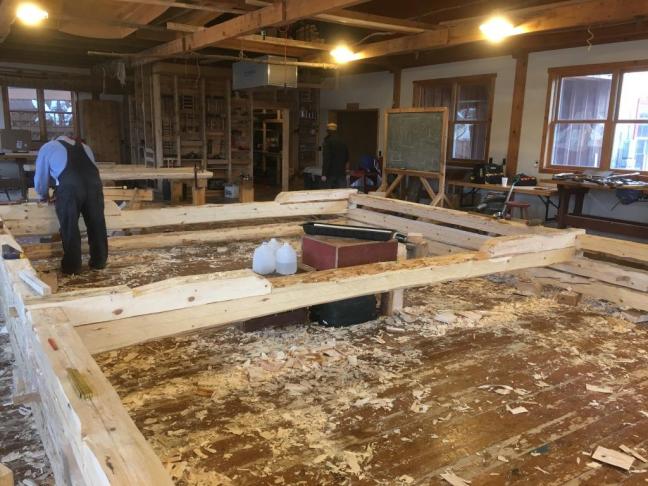
The second session was the beginning of cutting joinery. Soon the entire sill will be notched and joined. It should be noted that we continued to used only hand tools, adding to our axes with saws and chisels.
The Stavlinebyyg has its own unique building sequence. In constructing the building, the joinery was all done indoors in order to work in the safest and most effective fashion. First one joins the sill all around, and then joins all the horizontal members which includes the ‘stavline’ (post plate), the top plate and the ‘pillows’ which will be used to seat the three sets of robust, principle rafters. At this point, the roof construction is commenced and it also takes place more or less completely indoors. In this way, the builder avoids having to position themselves at great heights to measure, mark and cut joinery but can do it on a level surface and out of the elements.
Most of the measurements throughout the structure were done using three small wooden templates that were cut to provide all the critical distances involved in the joinery. Also used was a method for transferring parallel lines and cutting members to the proper thickness right at the joint. In our case, the rafter timbers were of a wide variety of diameters so the practical solution was to work off of a center line and remove material near the joints. Here we’ve used dovetails/angled joints on the corners and scarf joints along the sill.
 Scarf joint along the sill.
The stavline (post line) which this building style takes its name from, is the horizontal members that run along the tops of the posts. This length is often joined with a locking scarph joint (French lock) because this joint must be able to withstand both compression and tension from the angled uprights which serve as braces within the walls. Additionally, the joint must withstand powerful side forces (from wind) and downward pressure from the weight of the roof.
 Jane Laurence lays out a French locking scarph joint.
 Half of the French locking scarph join is ready.
 The stavline is laid in place upon the sill stock.
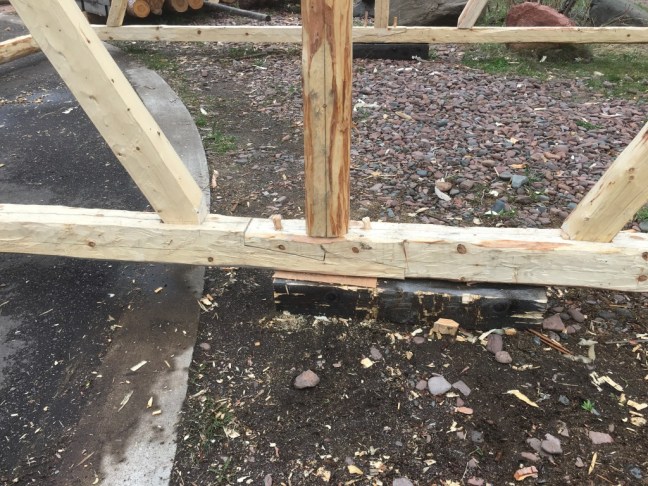
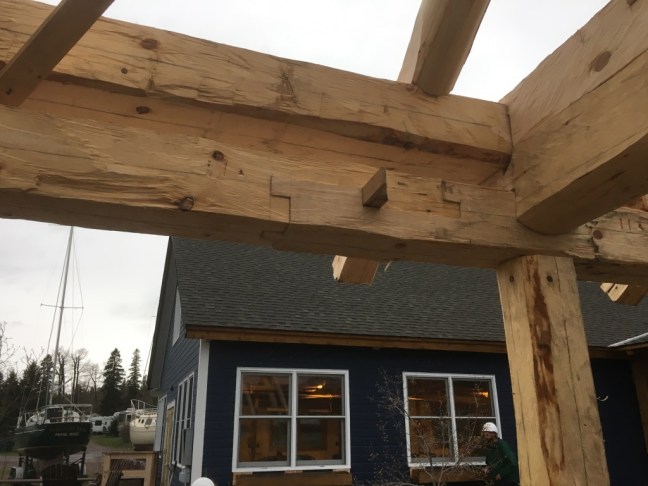 The completed French locking scarph joint in place in the building. By using the center line as reference for the layout measurements, the joint is tight fitting and square, despite the different dimensions of the rough timbers.
 The tie beams are fastened to the stavline with cogged lapped joinery. In this photo, we’re starting work on the rafters. Derek Rausch (with back to camera) positions the timber.
 The next and final stage before we begin the roof are the ‘pillows’ a type of platform onto which the primary rafters will be seated. These also serve to lock the primary rafters in place.
 Scott Carlson took responsibility for figuring out the length of the angled brace members within the walls. He drew up a very clear plan on the workshop floor in full scale. (Trond – not sure if I have this concept right)
 Scott’s drawing
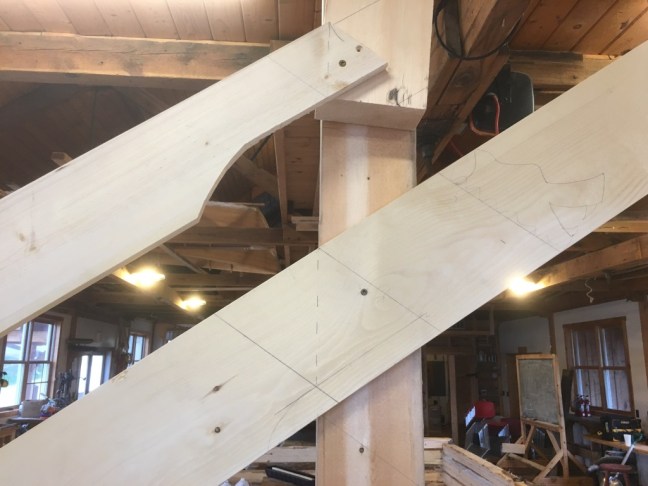
The stavs and bracing were produced using a pattern with tenons on top and bottom. The top tenons in the bracing were shorter than in the stavs/posts so that they can be set in place after the building has been raised. We see that there are two different lengths for the braces. The longer ones are for the ends and the shorter ones are for the long walls.
 Scott Carlson discusses the length of the bracing with Peter Henriksen, lead timber frame instructor at North House Folk School.
 Joe Donohue (facing away) works on braces.
 Camryn Boyle lays out posts.
 Here are Camryn Boyle and Matthew Labrenz in the production of upright posts.
 Mattew Labrenz is a carpenter from Fairbanks, Alaska.

This is the method for roof construction on a stavlinebygg which I learned from Halvard Haugen.
 The foot of the primary rafter and the very important joint which determines the the placement of the primary rafter being laid out and marked.
The measurements for the primary and secondary rafters and the placement and thickness of the openings for the ridge and purlins were figured out in full scale.
The six points where the primary rafters would be seated in the ‘pillows’ needed to be at the same height. We chose to work off the assumption that the floor may not be perfectly level. Staying true to our resolve to use hand tools and old methods, we chose a technique which uses a flat stick floating in a container of water, positioned at a point within the building. We confirmed that the small board was floating level. It’s important to use a piece of even thickness and weight. By turning the floating wood to site the six different places where the primary rafters would sit, we marked them to be of uniform height. The measurements were verified with a modern laser level, with a margin of error of 1-2 mm. Whether the error was the fault of the laser level or the floating stick, we could not be sure.
 A close up of the all important point where the base/foot of the primary rafter will be secured and supported by the building.
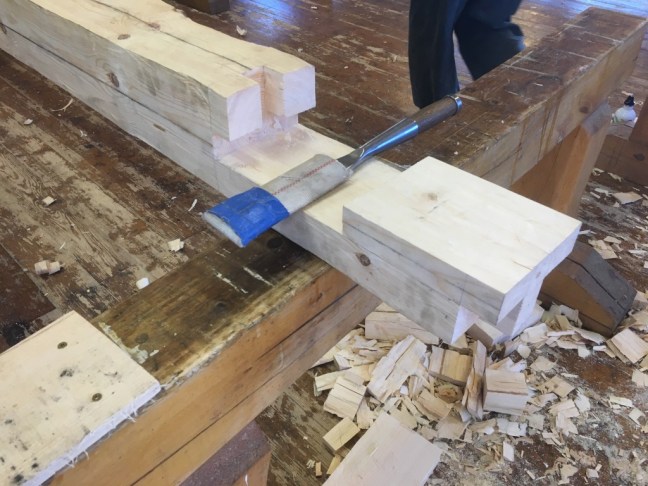
 Dale Torma cuts the base and mortise for the primary rafter.
 I think this technique is called ‘water boarding’ in English, but maybe it not used much in the USA.
 Dale Torma in action with a chisel.

Shawn Jensen (in the foreground) and Al Wilson marking measurements on the rafters.
 Marking for the tenon and base of the primary rafter
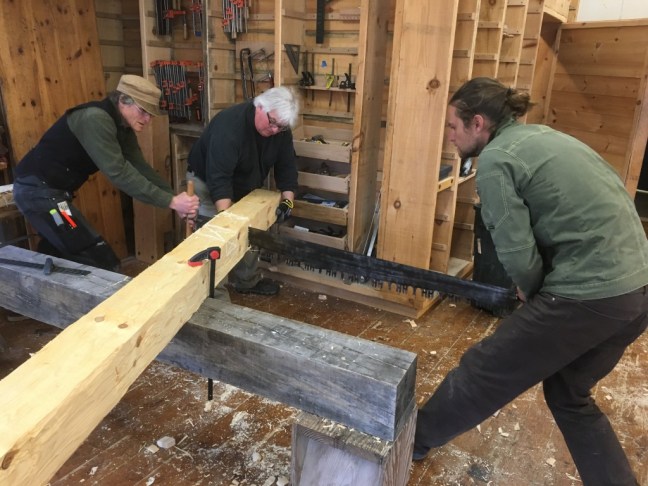 Peter Henrikson (left) and Nick Jorgenson cut a primary rafter with a two person crosscut saw. Joe makes sure it doesn’t split off.
 Kenny w. Cheever has made a jig for the secondary rafter cuts in the plate.
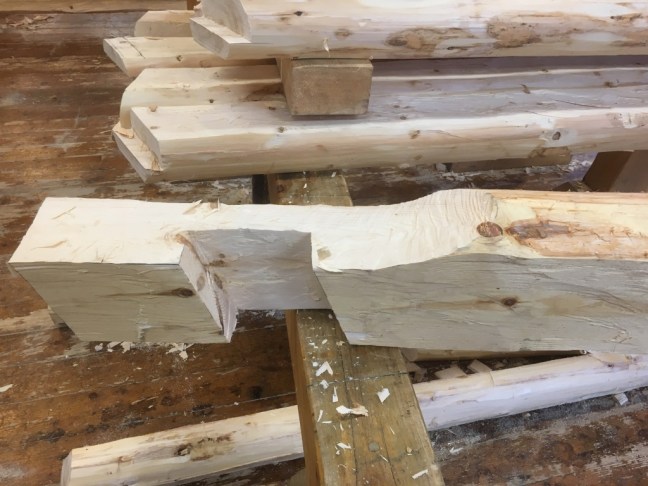 The top of the one primary rafter is ready to join with its complimentary other side with a joint that has half the stock cut away. The primary rafters will meet in the same plane.
 We test-raise a rafter.
There was not time to raise the entire roof assembly indoors, we put our faith in our measurements and craftsmanship (and were not disappointed).
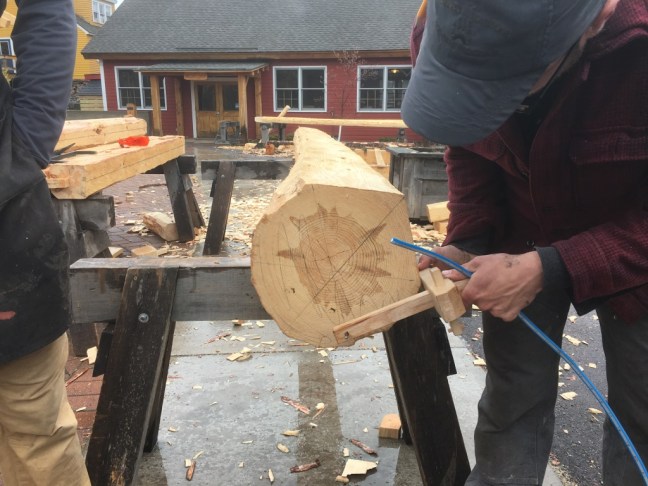 Mike Loeffler and Derek Rausch took responsibility for the measuring and cutting of the ridge and purlins. Here Mike uses a grindariv to transfer the angled surface of the ridgepole to the cutting line.
 As luck would have it, on the 17th of May, 2017, we were ready to raise the building and celebrate Norway’s Independence Day at the same time.
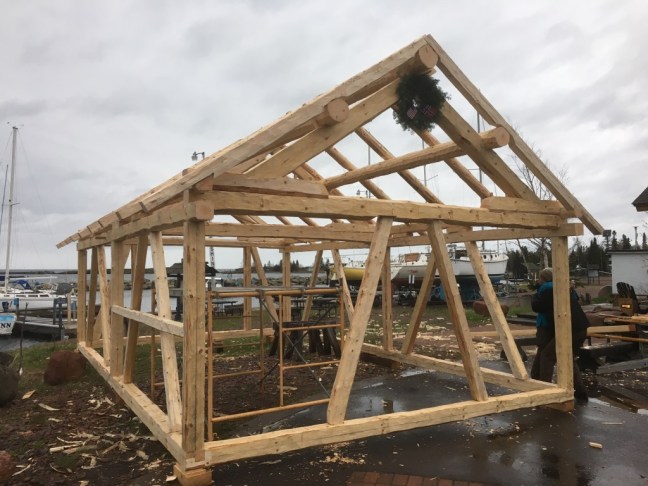 The building stands ready to be delivered to its permanent location (which is yet to be determined). We did not manage to install more than one nailing band (horizontal member that allows a continuous flush surface from sill to plate) but it is yet un known what kind of siding the building will receive.
 The nailing band fashioned by Scott Carlson at the last minute.
The brace mortises on the sill are purposely moved from their theoretical location so the braces are initially supporting the roof, with the posts non-bearing. Over time the roof will settle onto the posts and the bracing will remain tight and effective.
Stramming av strevar i Nordmørsk Stavline: https://tradisjonshandverk.com/2017/02/06/stramming-av-strevar-i-nordmorsk-stavline/
Note that the bracing is inset within the walls and has a dimension 2″ narrower than the rest of the members, such that the nailing band can be fastened directly to the outer surface of the bracing without the need for cutting.

The ridge and purlins after glepphugging, showing a variety of styles and quality reflecting the efforts of several students.

 There is a large port opening in one end of the building.

